HELLO


Hi there, welcome to my blog! and thankyou for stopping by. I have designed this blog to share with you knitting patterns that are my favourites and, i'll be trying out some new ones along the way. I also hope to help knitters new and old (i don't mean your age LOL) by sharing information, handy hints and tips, answering quieries and helping solve your knitting problems. Before you go, please help me by making a comment and suggest any knitting project you'd like to see.

Thanks again. Have a nice day!


Dianne

Wednesday, December 28, 2011

Knitting Trends for 2012

I hope you all had a great Christmas and are looking forward to celebrating the new year. 2012! where does the time go? seems like only yesterday we were getting ready to celebrate the millenium.
I've been looking to find what we can expect to see in 2012 world of knitwear.
First of all what colours can we expect to see?
Blues, nautical – and yes – TURQUOISE (you might guess one of my faourite colours) – bring a joyful, clear, and clean look to summer palettes.


Terra cotta will be very big in summer 2012, headed towards russet based hues, a big emphasis on terracotta tones will also be evidenced in home and housewares in 2012.


Greens, will emerge, symbolic healing renewal (and planet-friendly) – more limes than grassy greens.


Yellows, Golds and Greys – will also be emphasized, reminisant of ominous storm clouds retreating after a strong thunderstorm; with late afternoon sun breaking against yellow fall foliated trees ( how's that for being poetic? :))


The Spring/Summer 2012 season’s motto is: it is time to make a fresh new start, and unveil a season that promotes optimism, indulgence, contradiction and most of all modernism.
What can we expect to see in Knitwear?
Most of the 2012 collections consists of many beautiful basic garments for both business and leisure. They seem to have been inspired by retro fashions and you will find many trendy and cool designs in beautiful colors.


Derek Lam's spring collection, shown at New York Fashion Week, featured a number of simple-but-flattering lightweight sweaters and knit skirts.


Chanel can often be counted on for some sleek, chic knits.
 I love the texture and shape of this dress.

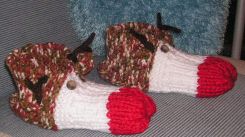
Some of the most interesting items, from a knitter's point of view, were accessories. Not scarves or hats after all, this is spring/summer,but shoes! Did I say knit shoes? YES!


In close-up, it's clear the shoes are beaded, but from a distance, they look to be knits that are slouched over the ankle.
Think I can  make a knit version of these shoes? I might have a go! :)

The latest design in the collaboration between Missoni and Converse was unveiled in Milan. It's a knit version of the old Converse running sneaker the Auckland Racer, for men, with the pattern inspired by vintage track suits that were designed by Ottavio Missoni back in 1948.


Just as shoes come knitted in Spring/ Summer 2012 season, so do bags. The knit trend continues to dominate the bag fashion scene for the Spring/Summer season. Knits are stylish, chic and unusual, they're also versatile so you won’t be having problems pairing it with your outfit. Go for bold and vibrant colors for that perfect summer vibe.


It's Official!
And the color of 2012 is…Tangerine!
I love it!
Pantone has officially announced that Tangerine Tango is the color of the year to come,described as a ‘reddish orange.’


What do you think of the colour Tangerine?
Love it? or Hate it?  Let me know .


I'm looking forward to knitting in 2012 trying new designs and using the new trend colours. Hope you are too! and who knows I may just come up with a knitted shoe! (I love a challenge)

Friday, December 23, 2011

Merry Christmas Everyone!

                        Merry Christmas
                                    &
                   A very Happy New Year

From
Knitting Galore xxx

Thankyou for your support.

                     Happy Knitting!
From Home to home, and heart to heart, from one place to another. The warmth and joy of Christmas, brings us closer to each other.
-Emily Matthews

Wednesday, December 21, 2011

Happy Bag + Happiness Survival Kit

First of all I want to thank Janet Callaway - The Natural Networker who has been a great source of inspiration since I started this blog and who gave me the idea for this pattern after reading her blog at
http://www.janetcallaway.com/12-essentials-for-your-happiness-kit
I thought it would make a great gift idea and decided to make a bag to go with it, so of course what would be better than to have a bag with a smiley face!
So here is my Happy Bag + Happiness Survival Kit

Happy Bag

Materials:
2 skeins Cotton type yarn
6mm needles
1/2yd material for lining
Cotton thread and sewing needle
Abbreviations used
 K = knit, p = purl,
k2tog = knit 2 together, yo = yarn over.

 x means to repeat the stitches in parentheses as many times as the number before the x.
Stitches in [bsst ] are border seed stitches,


Instructions:
Cast on 48 sts
Row 1 *k1, p1, repeat from * to end
Row 2 *p1, k1 repeat from * to end
These two rows form seed stitch repeat until 68 rows have been completed then place marker.
Work a further 14 rows of seed stich ending on a wrong side.
Smiley Face
The first 5 sts and last 5 sts of each row keep seed stitch border
Row 1) [5bsst], k37, [5bsst]
Row 2) and all wrong side rows [5bsst], p37, [5bsst]
Row 3) [5bsst], k12, (k2tog, yo), 6x k13, [bsst]
Row 5) [5bsst], k9, k2tog, yo, k15, yo, k2tog, k9, [5bsst]
Row 7) [5bsst], k6, k2tog, yo, k 21, yo, k2tog, k6, [5bsst]
Row 9) [5bsst], k4, k2tog, yo, k25, yo, k2tog, k4, [5bsst]
Row 11) [5bsst], k14, k2tog, yo, k1, k2tog, yo, k1, k2tog, yo, k15, [5bsst]
Row 13) [5bsst], k2, k2tog, yo, k8, k2tog, yo, k9, yo, k2tog, k8, yo, k2tog, k2, [5bsst]
Row 15) [5bsst], k10, k2tog, yo, k13, yo, k2tog, k10, [5bsst]
Row 17) [5bsst], k1, k2tog, yo, k6, k2tog, yo, k15, yo, k2tog, k6, yo, k2tog, k1, [5bsst]
Row 19) [5bsst], k1, k2tog, yo, k3, (k2tog, yo) 2x, k17, (yo, k2tog) 2x, k3, yo, k2tog,
k1, [5bsst]
Row 21) [5bsst], k1, k2tog, yo, k5, k2tog, yo, k17, yo, k2tog, k5, yo, k2tog, k1, [5bsst]
Row 23) [5bsst], k1, k2tog, yo, k9, k2tog, yo, k1, yo, k2tog, k3, k2tog, yo, k1, yo,
k2tog, k9, yo,k2tog, k1, [5bsst]
Row 25) [5bsst], k1, k2tog, yo, k8, k2tog, yo, k3, yo, k2tog, k1, k2tog, yo, k3, yo,
k2tog, k8, yo, k2tog, k1, [5bsst]
Row 27) [5bsst], k11, k2tog, yo, k3, yo, k2tog, k1, k2tog, yo, k3, yo, k2tog, k11, [5bsst]
Row 29) [5bsst], k2, k2tog, yo, k7, k2tog, yo, k3, yo, k2tog, k1, k2tog, yo, k3, yo,
k2tog, k7, yo, k2tog, k2, [5bsst]
Row 31) [5bsst], k12, k2tog, yo, k1, yo, k2tog, k3, k2tog, yo, k1, yo, k2tog, k12, [5bsst]


Row 33) [5bsst], k4, k2tog, yo, k25, yo, k2tog, k4, [5bsst]
Row 35) [5bsst], k6, k2tog, yo, k21, yo, k2tog, k6, [5bsst]
Row 37) [5bsst], k9, k2tog, yo, k15, yo, k2tog, k9, [5bsst]
Row 39) [5bsst], k12, (k2tog, yo) 6x, k13, [5bsst]
Row 41) [5bsst], k37, [5bsst]

Row 42) [5bsst], p37, [5bsst]
Work 12 rows seed stitch.
Cast off.

Handles Make 2
Cast on 6 sts
work in seed stitch until required length ( can be as long as you'd like)
Cast off.

Finishing
Fold bag in half (the markers are the middle) place cast on edge to cast off edge and sew side seams.
Pin handles in place then sew. Line if rquired. I lined with a red coloured material to show off smiley face.


The happiness survival kit :

An eraser to make all your mistakes disappear.

A penny so you will never be broke.

A rubber band to remind you to be flexible.

A string to tie everything together when all falls apart.

A mint to remind you that you are worth a mint to family and friends.

A marble so no one can say that you’ve lost all your marbles.

A Band Aid to remind you to heal hurt feelings.

A pencil to list your blessings every day.

A piece of gum to remind you to stick to it and you can accomplish anything.

A teabag to remind you to relax daily.

A toothpick to remind you to pick out the good qualities in others.

A kiss to remind you that someone, somewhere cares about you.

I placed all these together in a box and put the box in the bag with the smiley face to remind you to smile and thought this would make a perfect christmas gift.

Wishing you all  happiness this Christmas and throughout the New Year!


smiley face designed by Susan Mrenna 2006 Knit A Little http://knitalittlestore.blogspot.com

Tuesday, December 20, 2011

Jake's Twilight Beanie

Jacob "Jake" Black is a fictional character in the Twilight series by Stephenie Meyer He is described as a Native American of the Quileute tribe in La Push, near Forks, Washington. In the second book of the series, he undergoes a transformation that allows him to morph into a wolf
 As a werewolf  Jacob needs a hat that can be pulled very low over his eyes and ears. Very stretchy is also good for him, because his head shape may change. This pattern is based on a beanie he wore in that series, is very easy and knits up fast.

Materials:

100grms- Chunky type yarn

6mm (US10)  needles

Embroidery needle for weaving in ends and sewing seam.

Gauge: 10cm x 10cm = 18 stitches x 22 rows on 6mm needles.

Abbreviations:
K – knit
Kfb – knit into the front and back of the stitch
K2tog – knit two stitches together
P - purl
Rep – repeat
St st - stockinette stitch

Instructions:


Cast on 75 sts

Row 1 : *k1 p2; rep from * to end
Row 2 : * k2, p1, rep from* to end
Repeat these two rows until row 30 is completed.
Row 31: kfb, knit to end (76 sts)
Row 32 : purl
Continue in St st until work measures 8cm from top of ribbing.

Crown Decreases
Row 1: (k9, k2tog) 6 times, k10 (70 sts)
Row 2 and all alternate rows: purl
Row 3: (k8, k2tog) 7 times (63 sts)
Row 5: (k7, k2tog) 7 times (56 sts)
Row 7: (k6, k2tog) 7 times (49 sts)
Row 9: (k5, k2tog) 7 times (42 sts)
Row 11: (k4, k2tog) 7 times (35 sts)
Row 13: (k3, k2tog) 7 times (28 sts)
Row 15: (k2, k2tog) 7 times (21 sts)
Row 17: (k1, k2tog) 7 times (14 sts)
Row 19: (k2tog) 7 times (7 sts)
Break off yarn and thread through remaining sts with a yarn needle. Pull tight and
secure. Sew seam and weave in ends.

Monday, December 19, 2011

Easy Knit Baby Party Dress


This knitted party dress would make a unique present for your new little baby or the baby of a special friend.With puff sleeves and a ruffle at the bottom, your special little lady will be the belle of the ball.  4 button back enclosure. Ribbon trim above ruffle. Hand knitted from soft lightweight baby yarn.

Size 6 months

Materials
5-6oz (155gr) baby soft double knit type yarn.
size 4.25mm   (US 6) needles
3/8'' wide Red satin ribbon approx 1yrd

Gauge
St st (1row knit, 1 row purl) 5sts 7 rows =1inch

Instructions
Back - Ruffle
Cast on 98sts
Row 1 (right side) Purl.
Row 2 *K1, K1 in next stitch on row below ( see photo) rep from* to last 2sts, K2
Rows 3-8 repeat row 2
Row 9  K2 *K1 in next stitch on row below, K1 repeat from* across row
Row 10 - 14 repeat row 9
Row 15 - 26 repeat row 2

Skirt
Row 1 (decrease row) K2 *K2tog, K1 rep from * across - 66sts
Row 2 (eyelet row) K1 *K2tog, Yo, rep from* to last st K1
Row 3 Knit
Row 4 Purl
Work even in St st until skirt measures 5'' above ruffle ending with wrong side row.
Bodice Ribbing
Row 1 (RS) *P1, K1, rep from * across row
Row 2- 8 repeat row 1.
Dividing Row (RS)  Cast off 2 sts, K26, (P1,K1)twice, slip 31 sts just worked onto stitch holder for right back. Knit remaining sts and leave on needle for left back.

left back
Row 1 (wrong side) Cast off 2, purlto end, cast on 10 sts for button placket - 41sts
Row 2 (rs) Knit
Row 3 Purl
 Row 4 - 25 rep row  2 & 3 eleven times more.
Row 26 Cast off 32 sts. Knit rem 9sts
Row 27 cast off 5 sts Purl rem 4st
Row 28 Knit
Cast off.

Right back
Slip stitches for right back from stitch holder onto needle
Row 1 (ws) (P1, K1) twice, P27
Row 2 K27, (P1,K1) twice
Row 3 rep row 1
Row 4 (button hole row) K27, p1 cast off nxt st, K1
Row 5 P1, K1, cast on 1 st, K1, P27
Row 6 rep row 2
Row 7 - 18 rep rows 1 -6 2 times more
Row 19 - 24 rep rows 1 & 2 three times
Row 25 cast off 22 sts, Purl rem 9 sts
Row 26 cast off 5 sts, K rem 4sts
Row 27 Purl
Row 28 Cast off.

Front
 Work same as back to end of bodice ribbing.
Front Bodice
Row 1 (RS) Cast off 2 sts, knit across row
Row 2 Cast off 2 sts, purl across row
Row 3 Knit
Row 4 Purl
 Row 5 - 20 repeat rows 3 & 4  eight times more
Row 21 for left shoulder K9, K2tog, K1, cast off 38 sts. For rght shoulder slip 1 as if to knit, K1, psso, K remaining sts. 11sts on each shoulder, work both shoulders at same time, using seperate ball of yarn foe each shoulder.
Row 22 Purl across each shoulder
Row 23 on left shoulder K8, K2tog, K1. on right shoulder, K1, Sl1, K1, psso, K rem sts 10 sts on each shoulder
Row 24 Purl
Row 25 Left shoulder K7, K2tog, K1, right shoulder K1, Sl1, K1 psso, K rem sts 9 sts on each shoulder
Row 26 Purl
Row 27 Left shoulder cast off 6 sts, K rem sts, right shoulder K across sts
Row 28 Right shoulder cast off 6 sts purl rem sts, left shoulder purl across sts 4 sts each shoulder
Row 29 left shoulder cast off 4, right shoulder knit
Cast off all sts.

Sleeves (make 2)
Ribbing
cast on 31 sts
Row 1 (RS) K1, *P1, K1 rep from* across
Row 2 P1, *K1, P1 rep from* across
Row 3-6 rep rows 1&2 twice more
Body of sleeve
Row 1 (RS) * K1, knit front and back on next st, rep from* 14 times more, K1 -46 sts
Row 2 K1, K1 in nxt st on row below rp fro * to last 2 sts  K2
Row 3 -6  rep row 2
Row 7 K2, * K1 in nxt st on row below, K1 rep from * across
Row 8 - 12  rep row 7
Row 13 - 18 rep row 2
Row 19 - 24 rep row 7
Cast off.
Neck
Sew shoulder seams, hold dress right side facing begining at first st on button placket pick up 89 sts around neck edge finishing last st on right back
Row 1 K1,*P1, K1 rep from * to end
Row 2 P1,*K1, P1 rep from * to end
repeat  row 1&2
Cast off.
Finishing
Sew sleeves in place and side seams. Fix button placket and sew in place. Thread ribbon through eyelet.

Thursday, December 15, 2011

Baby Bunny Blanket Buddy

These blanket buddies are super soft and easy for little hands to grab and have such a cute face. They're one of those things that sometimes comes with a newborn layette set. They are tiny enough that they are safe to put in baby's crib, without being a suffocation hazard.Babies love to cuddle them to get to sleep. These would make awesome Christmas present for new baby or baby shower gifts, and are really really quick to make. Two hours maybe at the most.!


SIZE
One size

FINISHED MEASUREMENTS
Width: 5-7 inches
Length: 11-12 inches

MATERIALS

1 Skein baby soft boucle type yarn
Knitting Needles - Size 10.5 [6.5 mm]
Knitting Needles- Size 8 [5 mm]
Additional Materials
1. Small amount black worsted weight yarn
2. Small amount fiberfill stuffing


 This cuddly toy is worked in one piece. Gauge is not important for this project.
BLANKET BUDDY
With larger needles, cast on 1 st.
Rows 1-6 Knit into front and back of first st, knit to end of row – 7 sts at end of row 6.
Rows 7-39 K 3, yo, knit to end of row – 40 sts at end of row 39.
Rows 40-41 Cast on 12 sts for Paws, knit to end of row – 64 sts.
Rows 42-47 Knit.
Rows 48-49 Bind off 12 sts, knit to end of row – 40 sts.
Rows 50-61 K 2, k2tog, yo, k2tog, knit to end of row – 28 sts.
Shape Head
Change to smaller needles.
Row 62 K2tog across row – 14 sts.
Row 63 Knit into front and back of each st across row – 28 sts.
Row 64 *P 1, sl 1, rep from * across row.
Rep Row 64 until Head measures 3½in [9 cm].  The Head should be
worked tightly enough to hold the stuffing.


Shape Ears
Row 1 P3tog, return st to left needle, cast on 17 sts, p3tog, p 15 – 16 sts on right needle, 25 sts on left needle.
Row 2 Turn and p 14, p2tog – 40 sts.
Row 3 Turn and p 16.
Row 4 Turn and p 12.
Row 5 Turn and p 14.
Row 6 Turn and p 16, p2tog – 39 sts.
Row 7 Turn and p 18.
Row 8 Turn and p 16, p2tog – 38 sts.
Row 9 Turn and bind off 18 sts, p 1, *sl 1, p 1; rep from * across row – 20 sts.
Turn and rep Rows 1-9 for 2nd Ear. At end of 2nd Ear, 12 sts remain.


FINISHING
Cut a long length of yarn. With large-eyed blunt needle, thread yarn
through every other st on needle, then back through remaining sts. Remove knitting
needle and stuff Head. Pull yarn tightly to close top of Head and secure.
 Embroider face using black yarn and straight sts.
Weave in ends. Tie a knot in each Paw.

You can easily change the type of animal by changing the shape of the ears.


Happy Knitting!

Friday, December 9, 2011

Rudolf The Red Nose Reindeer Slippers


Today I sat on the floor in the middle of my livingroom with all my left over yarn arround me trying to decide what to make to try and reduce my stash. I decided I could use some slippers.Then it hit me!  and I had great fun knitting these Rudolf slippers!


You Will Need:
1 skein of Chunky type yarn any color. I chose a mottled yarn in browns and greens.
1 skein of chunky white
Small amount of chunky red
Small amunt of double knit type yarn in brown
2 buttons for eyes
Size 10 (6mm)knitting needles, large plastic needle, regular sewing needle and thread and 2 decorative buttons. This makes one pair of slippers.


Tension 4 sts and 6 rows (3 garter stitch ridges) = 1 inch

Available in small, medium and large size

Outer Moc:
Cast on 29 (35-41) sts with mottled yarn
Row 1: Knit across.
Row 2: K9(11-13), *P1,K9(11-13), repeat from *once more.
Repeat rows 1 and 2 until  20 (24-28) rows have been knit.
Change to white and work until 30 (34.38) rows have been knit


Shape Toe:
continue in white
Row 1: P1, *K1,P1, repeat from *across row
Row 2: K1, *P1,K1, repeat from *across row
Repeat these 2 rows until you have 6 rows (8-10) then change to red and work 6 (4-6) rows then work row 1 once more, cut off yarn leaving an 8” end.


Finishing:
Draw 8” end through remaining sts and pull up tightly, then sew with large plastic needle from beginning of ribbing to form toe. Fold cast one edge in half and sew inside seam for center back

To make the antlers I used a 4 st i-cord. After working 4 rows, I slipped 2 sts to a cable needle, working with the remaining 2 sts on my working needles, increased using the Make 1 increase. The next row, I increased again to regain 4 sts. After 4 rows, I repeated the above and once I had regained 4 sts a second time I broke my yarn, wove it through my remaining sts and pulled tight and secured. I then picked up my first 2 sts from the cable needle and working in i-cord, increase using Make 1 (3 sts) work 4 rows and break yarn, weave through remaining sts, pull tight and secure. Repeat for 2 set of slipped sts on cable needle for 2nd antler branch. Repeat for all four antlers.


Celebrate Christmas with everybody's favorite reindeer! These Rudolph slippers are great for giving as a gift.

Snowman Tree Ornament

Twelve Days Of Christmas Ornaments.
Day Twelve: Snowman Tree Ornament.

Use up your stash and knit this clever little snowman just in time for the holiday season. Knit as tree ornaments, gift toppers, or just to decorate your house this season.


Gauge:Not vital use larger needles and bulky weight yarn for a bigger ornament or smaller needles and double knit type yarn for a smaller one.

Gauge:
Not vital

Materials:
Small amount of red and white double knit type yarn
Needles appropriate to the yarn

Instructions

With White, CO 6 sts.
Row 1: K
Row 2: K1, k into front and back of next st, k2, knit into front and back of next st, k1 - 8 sts
Row 3: K
Row 4: K1, k into front and back of next st, k4, knit into front and back of next st, k1 - 10 sts
Row 5: K
Row 6: K1, k into front and back of next st, k6, knit into front and back of next st, k1 - 12 sts
Rows 7-13: K
Row 14: K1, ssk, k6, k2tog, k1 - 10 sts
Row 15: K
Row 16: K1, ssk, k4, k2tog, k1 - 8 sts
Row 17: K
Row 18: K1, ssk, k2, k2tog, k1 - 6 sts
Row 19: K
Row 20: k1, k into front and back of next st, k2, k into front and back of next st, k1 - 8 sts
Row 21: K
Row 22: k1, k into front and back of next st, k4, k into front and back of next st, k1 - 10 sts
Rows 23-27: K
Row 28: K1, ssk, k4, k2tog, k1 - 8 sts
Row 29: K
Row 30: K1, ssk, k2, k2tog, k1 - 6 sts
Row 31: K
Row 32: K1, ssk, k2tog, k1 - 4 sts
Row 33: K
Row 34: K1, k into front and back of next 2 sts, k1 - 6 sts
Row 35: K
Row 36: K1, k into front and back of next st, k2, k into front and back of next st, k1 - 8 sts
Rows 37-39: K
Row 40: K1, ssk, k2, k2tog, k1 - 6 sts
Row 41: K
Row 42: K1, ssk, k2tog, k1 - 4 sts
Row 43: ssk, k2tog - 2 sts
BO. Leave long tail and use to make loop for hanging.

Scarf
With Red, CO 45 sts. BO.
Hat
With Red, CO 8st knit 2rows,
BO 2 sts begning of next 2 rows
Knit 4 rows and BO.


Finishing
Make two french knots for eyes, one for nose, and 4 down center of body for buttons. Use a running stitch to make mouth. Sew hat in place. Wrap scarf around neck.

<><><><>
<>I made a little SNOWMAN;
He had a cheery smile.
I dressed him in a hat and scarf,
then went inside a while.
A STORM came up,
the wind was fierce;
My snowman was so CHILLY!
<>
<>He said he'd love to come inside,
but wouldn't that be SILLY?
I told him he was made of snow,
and though he felt BEFUDDLED,
If I agreed and brought him in,
he'd turn into a PUDDLE!


<>

Thursday, December 8, 2011

Mini Christmas Stocking

Twelve Days Of Christmas Ornaments.
Day Eleven: Mini Christmas Stocking.


Perfect for your tree, to give as a gift, or as a cute gift tag, this adorable mini stocking ornament makes good use of those odds and ends of yarn. It's a fun, quick knit that can be whipped up in an hour or two by most knitters.


I  worked it on double pointed needles because during heel shaping you need to switch from working one side to the other. You can knit it on regular needles but slide the work across onto a second needle at appropriate time. Apart from the stocking top it is worked in stocking stitch (knit on right side and purl on reverse)
Materials:
oddments of yarn. I prefer to knit these on 3.50 mm needles with double knit type yarn but the pattern will knit up with whatever you prefer.
Note, obviously the larger the needle size and thicker the yarn, the larger the finished stocking. Before you start, decide which colour you are going to knit the heel in and cut a length at least 110cm (44”) keep to one side for second heel shaping*.
Instructions:
 With green Cast on 25 sts,
rows 1 - 3: knit
row 4: (right side) begin pattern  in St st alternate 2 rows white 2 rows red
work a total of 14 rows of pattern ending with a wrong side row.
Heel shaping:
I like to use different coloured yarn to accentuate heel. The heel is worked in 2 halves.
row 18: with right side facing, k7 and turn leaving remaining stitches on needle
row 19: slip 1, p6
repeat these 2 rows 3 more times until 8 rows of heel have been worked
row 26: k3, k2tog through the back, k1, turn leaving 1 remaining stich of heel on needle


row 27: slip 1, p4
row 28: k2, k2tog through the back, turn leaving remaining 2 stiches on needle
row 29: slip 1, p2
row 30: k2, k2tog through the back, k1, turn
row 31: slip 1, p3
leaving these 4 stitches on needle with the main part of the stocking, slide all the work along needle, turn with wrong side facing and resume working the other side of the heel.


reverse row 18: with wrong side facing and using 110cm length of yarn cut earlier*, p7 and turn leaving remaining stitches on needle
reverse row 19: slip 1, k6
repeat these 2 rows 3 more times until 8 rows of heel have been worked
reverse row 26: p3, p2tog, p1, turn leaving 1 remaining stich of heel on needle
reverse row 27: slip 1, k4
reverse row 28: p2, p2tog, turn leaving remaining 2 stiches on needle
reverse row 29: slip 1, k2
reverse row 30: p2, p2tog, p1, turn
reverse row 31: slip 1, k3
row 32: with right side facing rejoin main colour of pattern (red) and begin knitting across first 4 stitches of heel shaping, pick up 5 stitches from inside edge of heel


 knit 11 stitches across main part of stocking, pick up 5 stitches from inside edge of 2nd heel half and knit final 4 stitches (29 stitches on needle)

keeping to stripe pattern
row 33: purl
row 34: K8, k2tog, k9, k2tog through the back, k8
row 35: p7, p2tog through the back, p9, p2tog, p7
row 36: K6, k2tog, k9, k2tog through the back, k6 (23 stitches)
row 37: purl
work 8 rows
row 46: with right side facing change colour for toe cap and work 2 rows


row 48: K3, K2tog through the back, k4, k2tog, k1, k2tog through the back, k4, k2tog, k3
row 49: purl
row 50: K3, K2tog through the back, k2, k2tog, k1, k2tog through the back, k2, k2tog, k3 (15 stitches)
row 51: purl
Making Up:
Cut work from the ball leaving a long end for sewing up. Thread end through 15 stitches on needle  and pull up tight.


Join seam running up bottom and back of stocking using mattress stitch.
Turn inside out and tie up all ends securely and trim - no need to sew them in. Turn right side out.
Hanging loop:  with crochet hook make chain stitch or cast on 35 stitches and then cast them off. Double strip over to make a loop and sew to back of stocking.

Here's a photo of my tree with all knitted ornaments.


Wednesday, December 7, 2011

Christmas Star Ornament

Twelve Days Of Christmas Ornaments.
Day Ten: Christmas Star Ornament.

Who doesn't love homemade christmas  crafts? You may remember the handmade ornaments that filled your grandparents' tree. You may also have a few treasured ornaments that you made in elementary school. You probably enjoy reminiscing as you pull out the ornaments each year and hang them on the tree. It's never too late to make new ornaments, and here is a star to add to your collection.


This is a pretty star knitted in simple lace. Make as a tree decoration, or hang in front of windows to show the world your knitting skills.
Materials:
4mm needles
Approx 10g of Double Knitting Weight Yarn
To Make:
Cast on 10 sts and K 1 row.
2nd row: Sl1, Inc1 (knit into front and back of the stitch), *yf, K2tog; rep from * to last 2 sts, K2tog.
3rd row: K to end.
Rep the 2nd and 3rd rows twice more.
Cast off.
Repeat 4 more times
Arrange all 5 pieces in star shape and sew together.
Make hanging loop and sew to one of the star points.


This star is so pretty and knits up so quick, done in barely an hour!


Hang em' everywhere...

Tuesday, December 6, 2011

I-Cord Candy Cane

Twelve Days Of Christmas Ornaments.
Day Nine: Candy Cane.


Everyone loves a candy cane - especially one that can be hung year on the tree year after year without getting sticky and is sugar free!


Materials:
red yarn
white yarn (scrap yarn is fine. you will not need a lot of yardage, unless you are going to make hundreds)
two double pointed needles that are the appropriate size for yarn. (or, one circular needle that you can slide the yarn from end to end.)
wire


Gauge:  doesn’t  matter. It will differ depending on the yarn you use, thinner yarn=smaller candy canes, thicker yarn=bigger candy canes.

Instructions:
Cast on 5 white (slide)
*knit 4 white, and 1 red, (slide)
knit 3 white, 1 red, 1 white (slide)
knit 2 white, 1 red, 2 white (slide)
knit 1 white, 1 red, 3 white (slide)
knit 1 red, 4 white (slide) *
Repeat from * until you have a cane as long as you would like.
When the cane is the length that you are happy with, then cast off. The cast off stitches will look like a straight line. So you will need to weave in the tail. Take the tail, and begin by weaving in the stitch opposite of where the tail is, to form the last row into a tube. Sew through all the stitches, gathering them up. Then bury the yarn in the middle of the chord itself.
To give the cane a little structure, I took a piece of wire, and carefully stuck it into the middle of the i-chord.


These cute little ornaments knit up in a jiffy, and once you have the technique down, you can do them in as many different widths, color and stripe combinations as you want!

Have fun Knitting!

Monday, December 5, 2011

Mini Christmas Parcels


A cute parcel approximately 1 ½” cubed, to hang from your tree. Alternatively, make several and place in a bowl as a pretty centrepiece. Christmas ornaments make great gifts, or you can choose to decorate your mantel with classic ornaments that you've proudly created on your own.


Materials:
Double Knit type Yarn in main colour and small amount in contrast.
Size 3.50mm needles.
Stuffing.

Instructions:
Cast on 10 sts and work 27 rows stocking (stockinette) stitch.
Cast on 10 stitches at the beginning of the next two rows and work 11 rows stocking stitch.
Cast off 10 stitches at the beginning of the next two rows.
Work 13 rows stocking stitch.


To Make Up:
Sew up the box, leaving an opening to stuff.
Stuff the box and sew the remaining seam(s)


For the ribbon I used a crochet hook, with contrast coloured yarn and made chain stitch till required length or you could cast 140 sts, Knit 1 row and cast off. Then tie around the parcel cross at the back finishing with a bow at the front.


 Happy Knitting!