HELLO


Hi there, welcome to my blog! and thankyou for stopping by. I have designed this blog to share with you knitting patterns that are my favourites and, i'll be trying out some new ones along the way. I also hope to help knitters new and old (i don't mean your age LOL) by sharing information, handy hints and tips, answering quieries and helping solve your knitting problems. Before you go, please help me by making a comment and suggest any knitting project you'd like to see.

Thanks again. Have a nice day!


Dianne
Showing posts with label i-cord. Show all posts

Monday, February 25, 2013

Easy Knit String Shopping Bag


Sure you can buy some trendy brand name shopping bags, but why not make your own!
Here’s a knit pattern using a mesh stitch. Nice, big & stretchy! This bag works up quickly and stretches upwards and outwards to hold a large amount of items. Make yourself several and carry in your car for shopping trips and help the environment. A nice present for Mothers day too!


Materials 
3 x 50gm Balls Cotton DK  
6mm needles 

Instructions 
Bag sides - make 2 
Cast on 50 sts 
Work 4 rows garter stitch 
Pattern Row: 
Knit 4 *yo, k2tog* repeat from * to * to last 4 sts. 
K4. 
Repeat pattern row until work measures 14inches (35cm), work 
4 rows garter stitch. Cast off. 

Handles – make 2 
Cast on 4 stitches. 
Work i cord until work measures 14 inches (35cm) or desired length (remember will stretch quite a bit depending on yarn)

Wednesday, August 22, 2012

Wednesday Question : What Is An I - Cord?


All knitters have questions about the best way to do things, why different things happen while they are knitting, how to fix knitting mistakes and more. Here is this weeks questions posed by a new knitter. Question from Angelena : What is an I - cord?


Answer: An I-cord is a narrow piece of knitting made on double-pointed needles that can be made as long as you like for a thousand different uses, either utilitarian or decorative. They can be made of any yarn as long as you have double-pointed needles that are similar in size to the gauge of the yarn (use smaller needles with finer yarn, bigger needles with heavier yarn).
To make an I-cord, cast on a few stitches (usually between three and six). Knit the first row. Slide the stitches to the opposite end of the needle. Now the working yarn is at the bottom of the row. Knit again, pulling the working yarn up the back of the piece so you can work with it.
Again slide the stitches to the opposite end of the needle. Repeat in this manner for as long as you like. As you pull the yarn the back will close up on itself, like magic. If you have a very wide I-cord you might need to help it along by giving the cord a tug when you've worked a few inches.
I-cords are great because once you've made one, you'll start thinking of all sorts of uses for them. Here are just a few ways you might use them:
  • Strap or handles for a purse or bag.
  • Straps for a knitted shirt or dress.
  • Use it as a belt.
  • Make a headband.
  • Sew the cord together to make a flower, a spiral, or some other shape you can use on another knitted project.
  • Use as a tie for a hoodie or in place of elastic in a hem.
  • Jewelry - bracelets and necklace etc.
If you have a knitting question for Knitting Galore, please email it to : dbjones5559@hotmail.co.uk  or  Please  post it as a comment here.  All questions will be answered, and many are selected and answered each wednesday here on the Blog. 

Wednesday, March 21, 2012

How to Make an I Cord


Making an I-cord is one of those things that seems mysterious and difficult until you now how to do it. I waited a long time to sit down and make an I-cord because it always sounded kind of scary to me, probably because it involves double-pointed needles, which I'm not too keen on.

The good news is that making a I-cord is really quick and easy, and you can use them for all sorts of things, from the strap of a bag to hair accessories.


How to make I- Cord

I-cord is a simple knitting technique that creates a very narrow tube of knitting that looks a bit like French knitting.
Cast on the number of stitches desired or called for by a pattern with double pointed needles. Between three and five is normal.
Knit one row. Do not turn the work. 
Slide the stitches to the other end of the needle. 
Knit a second row by bringing the yarn behind the work and starting with the first stitch. Tug the work from the bottom after each first stitch to help it to take shape and to even out the tension. 
Repeat steps 3 and 4 until desired length is achieved. It'll start to take shape after 3/4 rows. 

Uses for I-Cord
I-cords is great because once you've made one, you'll start thinking of all sorts of uses for them. Here are just a few ways you might use them:
Strap or handles for a purse or bag.
Straps for a knitted shirt or dress.
Use it as a belt.                                       


                                                                             Make a headband


Sew the cord together to make a flower, a spiral, or some other shape you can use on another knitted project.
Use as a tie for a hoodie or in place of elastic in a hem.


Necklace, bracelet or broach the list is endless.


Here is a link to a video showing how to make i- cord     http://www.youtube.com/watch?v=jcGj6tpqeJA 


Enjoy!

Tuesday, December 6, 2011

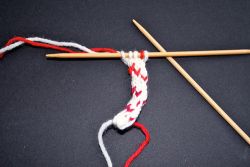
I-Cord Candy Cane

Twelve Days Of Christmas Ornaments.
Day Nine: Candy Cane.


Everyone loves a candy cane - especially one that can be hung year on the tree year after year without getting sticky and is sugar free!


Materials:
red yarn
white yarn (scrap yarn is fine. you will not need a lot of yardage, unless you are going to make hundreds)
two double pointed needles that are the appropriate size for yarn. (or, one circular needle that you can slide the yarn from end to end.)
wire


Gauge:  doesn’t  matter. It will differ depending on the yarn you use, thinner yarn=smaller candy canes, thicker yarn=bigger candy canes.

Instructions:
Cast on 5 white (slide)
*knit 4 white, and 1 red, (slide)
knit 3 white, 1 red, 1 white (slide)
knit 2 white, 1 red, 2 white (slide)
knit 1 white, 1 red, 3 white (slide)
knit 1 red, 4 white (slide) *
Repeat from * until you have a cane as long as you would like.
When the cane is the length that you are happy with, then cast off. The cast off stitches will look like a straight line. So you will need to weave in the tail. Take the tail, and begin by weaving in the stitch opposite of where the tail is, to form the last row into a tube. Sew through all the stitches, gathering them up. Then bury the yarn in the middle of the chord itself.
To give the cane a little structure, I took a piece of wire, and carefully stuck it into the middle of the i-chord.


These cute little ornaments knit up in a jiffy, and once you have the technique down, you can do them in as many different widths, color and stripe combinations as you want!

Have fun Knitting!